Project Page: code.google.com/p/gb-enhanced/
Project Name: GB Enhanced
Hello everyone. For the past year or so, I've been working on my very first emulator. I've been programming for years and have been involved with emulators as an end-user for over a decade now, but I've never gotten into programming emulators until recently. Hopefully GB Enhanced will serve as a gateway to other handhelds I have my eyes on (the GBA and DS primarily).
The goal of GB Enhanced is to provide a highly portable emulator (using only C++ and SDL) while including as many optional enhancements as possible. Anyway, yes, GB Enhanced is yet another Game Boy emulator, but we all have to start somewhere right?
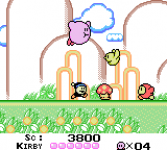
GB Enhanced does offer something new to the emulation scene however: custom graphics. GB Enhanced has the ability to dump or extract sprites and backgrounds, let the user edit them, and then dynamically inject those graphics back into the game. This allows for users to modify the game's look and feel without ROM hacking. Anything that can be seen in the game can be changed (with some limitations mind you). GB Enhanced even lets players colorize old monochrome games.
Screenshot of Kirby's Dream Land with custom graphics (also in attachments):
i1.minus.com/jZgBmfdw9IoeE.png
Video of the game with custom graphics in action (mind the poor audio quality):
GB Enhanced will play most games without any noticeable issues, but there are still things to work out and many more features I would like to add (tons of scaling filters). At any rate, I'm releasing an initial 1.0 version since there's been a lot of work done so far. Not expecting anyone to start raving about it and using it as their default GB emulator, but I do appreciate testers and bug reporters (especially with the custom graphics).
Other misc. notes, it supports 360 controllers out of the box. No GBC support yet (it's not done in master, but like 95% done in a different branch). No save states either (it's coming ). I appreciate any and all feedback.
===========================================================================
UPDATE - 5/19/2014
"HD" custom graphics are ready for user testing! This only works with DMG games or GBC games that are running in DMG mode. GBC support is planned in the future, but this is an important first step that needs to be sorted out for bugs before merging into master.
DOWNLOAD : GB Enhanced - custom-gfx-hd
Tutorial
1) To make custom graphics, extract the ZIP archive and edit the gbe.ini file. Change this line from 0 to 1. Drag and drop your Game Boy ROM in Windows Explorer over gbe.exe. The emulator will now run in dumping mode to extract the graphics.
2) Sprites are automatically dumped into the Dump\Sprites folder as the game generates them. Background tiles must be dumped manually via the mouse. Hover your mouse over the screen. GBE will highlight the background tile that it will dump. Any tiles that are the same as the one under the mouse cursor will be highlighted as well. This is to give users more control over which graphics they can edit and have an idea of where each tile is used in the game. Dumping hundreds of background tiles automatically is not very user friendly (since you largely cannot tell what goes where). Left-Click with the mouse to actually dump the tile. Background tiles will be dumped to the Dump\BG folder.
Screenshot - Dumping BG Tiles
3) Once you have dumped the sprites and background tiles, you can edit them. Open the images in your editor of choice and make your changes. Important: GBE only supports loading 24-Bit BMPs and 24-bit PNGs Make sure you remove/do not add an alpha channel to these images. I highly recommend GIMP or anything but MS Paint. When making "HD" graphics, GBE supports scales of 2x to 4x of the image's original size. 1x custom sprites are of course supported as well. Please note, when making "HD" graphics, all of the edited images should use the same scale (e.g. mixing 2x edits with 3x edits is a no-no).
Screenshot - Preparing to edit the dumped graphics
4) Move the edited images to the corresponding Load\Sprites or Load\BG.
5) To load the custom graphics, first change this line in gbe.ini back to 0. Now change this line to 1 to load custom graphics.
6) If you are using "HD" custom graphics, change this line in gbe.ini to reflect the scale factor used (2x, 3x, 4x).
7) If you are using PNGs for the custom graphics, change this line in gbe.ini to 1. Otherwise, leave it on 0. Note, GBE does not support mixing and matching the file types it loads. It will only load all PNG files, or all BMP files.
8) In Windows Explorer, drag and drop the Game Boy ROM over gbe.exe. The game should now start with your custom graphics! Enjoy your work!
Screenshot - Tetris ... with Pokeballs
===========================================================================
Project Name: GB Enhanced
Hello everyone. For the past year or so, I've been working on my very first emulator. I've been programming for years and have been involved with emulators as an end-user for over a decade now, but I've never gotten into programming emulators until recently. Hopefully GB Enhanced will serve as a gateway to other handhelds I have my eyes on (the GBA and DS primarily).
The goal of GB Enhanced is to provide a highly portable emulator (using only C++ and SDL) while including as many optional enhancements as possible. Anyway, yes, GB Enhanced is yet another Game Boy emulator, but we all have to start somewhere right?
GB Enhanced does offer something new to the emulation scene however: custom graphics. GB Enhanced has the ability to dump or extract sprites and backgrounds, let the user edit them, and then dynamically inject those graphics back into the game. This allows for users to modify the game's look and feel without ROM hacking. Anything that can be seen in the game can be changed (with some limitations mind you). GB Enhanced even lets players colorize old monochrome games.
Screenshot of Kirby's Dream Land with custom graphics (also in attachments):
i1.minus.com/jZgBmfdw9IoeE.png
Video of the game with custom graphics in action (mind the poor audio quality):
GB Enhanced will play most games without any noticeable issues, but there are still things to work out and many more features I would like to add (tons of scaling filters). At any rate, I'm releasing an initial 1.0 version since there's been a lot of work done so far. Not expecting anyone to start raving about it and using it as their default GB emulator, but I do appreciate testers and bug reporters (especially with the custom graphics).
Other misc. notes, it supports 360 controllers out of the box. No GBC support yet (it's not done in master, but like 95% done in a different branch). No save states either (it's coming
===========================================================================
UPDATE - 5/19/2014
"HD" custom graphics are ready for user testing! This only works with DMG games or GBC games that are running in DMG mode. GBC support is planned in the future, but this is an important first step that needs to be sorted out for bugs before merging into master.
DOWNLOAD : GB Enhanced - custom-gfx-hd
Tutorial
1) To make custom graphics, extract the ZIP archive and edit the gbe.ini file. Change this line from 0 to 1. Drag and drop your Game Boy ROM in Windows Explorer over gbe.exe. The emulator will now run in dumping mode to extract the graphics.
2) Sprites are automatically dumped into the Dump\Sprites folder as the game generates them. Background tiles must be dumped manually via the mouse. Hover your mouse over the screen. GBE will highlight the background tile that it will dump. Any tiles that are the same as the one under the mouse cursor will be highlighted as well. This is to give users more control over which graphics they can edit and have an idea of where each tile is used in the game. Dumping hundreds of background tiles automatically is not very user friendly (since you largely cannot tell what goes where). Left-Click with the mouse to actually dump the tile. Background tiles will be dumped to the Dump\BG folder.
Screenshot - Dumping BG Tiles
3) Once you have dumped the sprites and background tiles, you can edit them. Open the images in your editor of choice and make your changes. Important: GBE only supports loading 24-Bit BMPs and 24-bit PNGs Make sure you remove/do not add an alpha channel to these images. I highly recommend GIMP or anything but MS Paint. When making "HD" graphics, GBE supports scales of 2x to 4x of the image's original size. 1x custom sprites are of course supported as well. Please note, when making "HD" graphics, all of the edited images should use the same scale (e.g. mixing 2x edits with 3x edits is a no-no).
Screenshot - Preparing to edit the dumped graphics
4) Move the edited images to the corresponding Load\Sprites or Load\BG.
5) To load the custom graphics, first change this line in gbe.ini back to 0. Now change this line to 1 to load custom graphics.
6) If you are using "HD" custom graphics, change this line in gbe.ini to reflect the scale factor used (2x, 3x, 4x).
7) If you are using PNGs for the custom graphics, change this line in gbe.ini to 1. Otherwise, leave it on 0. Note, GBE does not support mixing and matching the file types it loads. It will only load all PNG files, or all BMP files.
8) In Windows Explorer, drag and drop the Game Boy ROM over gbe.exe. The game should now start with your custom graphics! Enjoy your work!
Screenshot - Tetris ... with Pokeballs
===========================================================================
Attachments
Last edited:


