~
Follow this guide to run Djipi's Zelda pack
~
1 - Go to the Emulator folder, then go to the "Plugin" folder. PJ64 1.6\Plugin
If you are using PJ641.7 go to \Plugin\GFX\
If you are using PJ64 2.1 the file path will be \Plugin\1.6 plugins
2 - In this folder, you must have the glide64 plugin.
(Remember to leave the glide3x.dll in the root folder.)
3 - Now go create the "cache" folder.
PJ64 1.6\Plugin\cache
PJ64 1.7\Plugin\GFX\cache
PJ64 2.1 (2.0)\Plugin\GFX\Cache
If your using PJ64 2.2+ (PJGlide). (Not recommended)
DAT archives are placed as followed:
/textures/cache/.dat
Packs with folders are placed as followed:
Project64/textures/SUPER MARIO 64
As the included Gilde64 plugin no longer uses the plugin or hires-texture directory to load files.
4 - In cache folder, Unzip the archive that contains the .DAT
Now that you have your plugin and texture pack installed correctly lets configure them, using the following steps.
1 - Open your emulator, Click on "Option" and "Settings"
2 - In the setting windows, go to the Video plugin and select "Glide64"
3 - After clicking "Ok" Close the "settings" windows .
4 - Click on "Option" and "Configure Graphics setting"
5 - On the fist page , Check "Show texture enhancement options"
6 - After clicking Ok , you must now see in "configure graphics setting" a new page named "Texture enhancement".
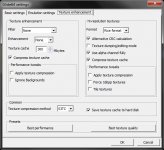
7 - Go on this new page and in the "Hi-resolution textures" place configure like this :
Format : Rice
Check "Alternative CRC calculation"
Optional:
Suggestion is made to uncheck this option as some textures may not load,
However Djipi has stated that this should be checked.
Uncheck "Texture dumping/editing mode"
Check "Use alpha channel fully"
Check "Compress texture cache"
All the other option are unchecked in "performance tweaks"
And finally , check "Save texture cache to hard disk" and for texture compression method, select "S3TC"
~
Credit goes to @Djipi
Shout out to @Fanatic 64
Shout out to @Frank74
~
Attachments
Last edited:


