CCTEX
New member
HighResEaser 1.7 CCTEX MOD 9/27/15
HighResEaser 1.7 CCTEX MOD is here, more powerful, more user-friendly!
microdev's amazing HighResEaser (1.4 last official version) saves users a ton of time. My modifications of HRE on this thread serve to save you even more time with new features ranging from FULL automation of texture surveying/sorting to alternative methods of marking narrow textures when legibility is an issue.
Since MOD v1.6, the need to manually take note of the texture order has been eliminated; but the alternative marking methods I created remain in the script, and you can read the documentation of those features in MOD v1.5's release post in this thread. If you're new to HRE or retexturing, read the official documentation first.
Download HRE CCTEX MOD 1.7
New features
-ROBOREAD support for backgrounds/titles with multiple textures per row
-Detection/resolution of malformatted screenshots during ROBOREAD processing
-Realtime visual feedback during ROBOREAD processing
-User input error handling
Changes:
-Button/dropdown/help labels updated to be more intuitive
-ROBOREAD horizontal offset is a now relative percentage
-ALL resulting values are auto-filled & 'read only' after ROBOREAD
Bugfixes:
-Bugfix from original HRE that prevented loading transparent textures
-Bugfix from original HRE that crashed saving empty HiRes layer tiles
-Bugfix from HRE 1.6 that output ROBOWRITE colors at varying lengths
Watch the updated ROBOREADER demo from HRE 1.7
Documentation of features introduced in this version:
 Spoiler:
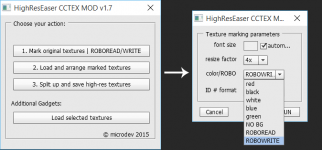
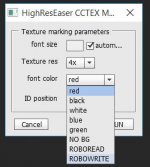
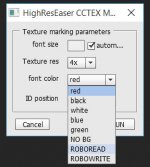
Modification Utility 1: (Listed as 'ROBO-WRITE under the 'color/ROBO' drop-down in '1. Mark original textures| ROBOREAD/WRITE')
NOTE: This must be used prior to ROBO-READ.
Set scaling as desired, ID Position will be ignored. Select your source/save directories as usual. Your textures will be processed with encoded color overlays to be read later by ROBO-READ.

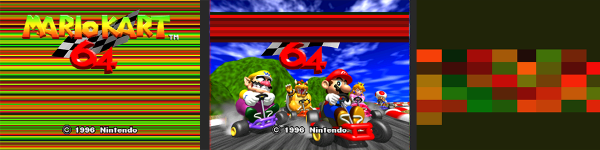
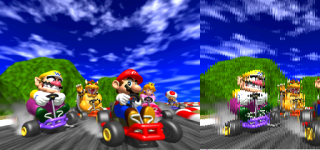
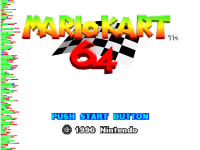
After encoding, you need to take a screenshot of the textures in use in the emulator. It should look like one of the examples below:

If your textures do not fill entire screenshot (shown in the middle example above), you must crop the screenshot before processing with ROBOREAD
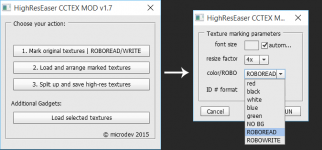
Modification Utility 2: (Listed as 'ROBO-READ under the 'color/ROBO' drop-down in '1. Mark original textures| ROBOREAD/WRITE')
NOTE: After processing your textures with ROBO-WRITE, you need to take a screenshot of the processed background textures while in use in the emulator.
All other parameters are ignored when using ROBO-READ.

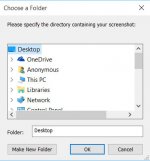
You will be asked for the directory containing your screenshot, make sure there are no other files in the directory other than your screenshot.

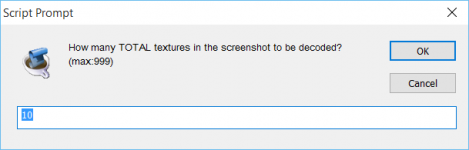
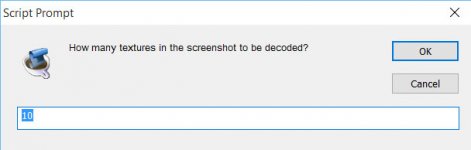
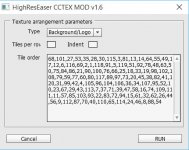
You are then prompted for the total amount of textures (in total, not unique) contained in the screenshot. Be sure to enter this correctly:

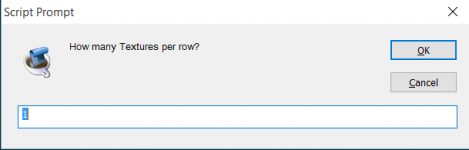
Now enter the amount of textures per row in the screenshot:

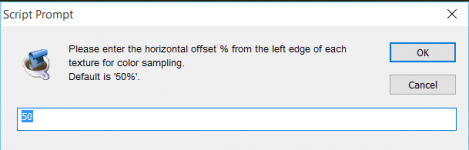
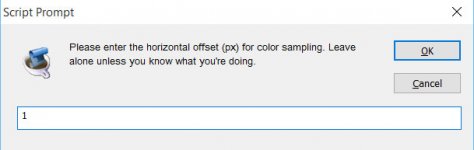
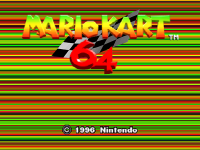
Leave this as default (50%) if your screenshot contains multiple textures per row OR if your screenshot is unobscured by other textures like titles, popups, icons (which sometimes requires you to load blank transparents of those overlays into the emulator before taking your screenshot). Otherwise, if overlay obstacles obscure portions of your textures to be read, you can change the horizontal offset (%) from the left edge of each texture for its color sampling coordinate to provide a clear path to read the color bars all the way from top to bottom. In the screenshot example above, where the overlay 'MarioKart 64' took up the middle of the screen, a value of 5% or 95% would provide a clear path around the overlay.

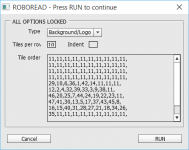
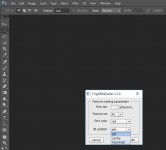
After a few seconds of processing the decoded values & TPR are automatically fed into Step 2 of HighResEaser! Simply press RUN, or copy the decoded values for future reference.

If you did click RUN, you would continue just as in legacy HRE, selecting the directory containing the original textures, and watch them load up. Here is the result for the screenshot examples above:

Thanks to [MENTION=6631]microdev[/MENTION] [MENTION=29958]NES_player4LIFE[/MENTION] [MENTION=52820]mode7[/MENTION] [MENTION=58381]Datadayne[/MENTION]
HighResEaser 1.7 CCTEX MOD is here, more powerful, more user-friendly!
microdev's amazing HighResEaser (1.4 last official version) saves users a ton of time. My modifications of HRE on this thread serve to save you even more time with new features ranging from FULL automation of texture surveying/sorting to alternative methods of marking narrow textures when legibility is an issue.
Since MOD v1.6, the need to manually take note of the texture order has been eliminated; but the alternative marking methods I created remain in the script, and you can read the documentation of those features in MOD v1.5's release post in this thread. If you're new to HRE or retexturing, read the official documentation first.
Download HRE CCTEX MOD 1.7
New features
-ROBOREAD support for backgrounds/titles with multiple textures per row
-Detection/resolution of malformatted screenshots during ROBOREAD processing
-Realtime visual feedback during ROBOREAD processing
-User input error handling
Changes:
-Button/dropdown/help labels updated to be more intuitive
-ROBOREAD horizontal offset is a now relative percentage
-ALL resulting values are auto-filled & 'read only' after ROBOREAD
Bugfixes:
-Bugfix from original HRE that prevented loading transparent textures
-Bugfix from original HRE that crashed saving empty HiRes layer tiles
-Bugfix from HRE 1.6 that output ROBOWRITE colors at varying lengths
Watch the updated ROBOREADER demo from HRE 1.7
Documentation of features introduced in this version:
Modification Utility 1: (Listed as 'ROBO-WRITE under the 'color/ROBO' drop-down in '1. Mark original textures| ROBOREAD/WRITE')
NOTE: This must be used prior to ROBO-READ.
Set scaling as desired, ID Position will be ignored. Select your source/save directories as usual. Your textures will be processed with encoded color overlays to be read later by ROBO-READ.
After encoding, you need to take a screenshot of the textures in use in the emulator. It should look like one of the examples below:
If your textures do not fill entire screenshot (shown in the middle example above), you must crop the screenshot before processing with ROBOREAD
Modification Utility 2: (Listed as 'ROBO-READ under the 'color/ROBO' drop-down in '1. Mark original textures| ROBOREAD/WRITE')
NOTE: After processing your textures with ROBO-WRITE, you need to take a screenshot of the processed background textures while in use in the emulator.
All other parameters are ignored when using ROBO-READ.
You will be asked for the directory containing your screenshot, make sure there are no other files in the directory other than your screenshot.
You are then prompted for the total amount of textures (in total, not unique) contained in the screenshot. Be sure to enter this correctly:
Now enter the amount of textures per row in the screenshot:
Leave this as default (50%) if your screenshot contains multiple textures per row OR if your screenshot is unobscured by other textures like titles, popups, icons (which sometimes requires you to load blank transparents of those overlays into the emulator before taking your screenshot). Otherwise, if overlay obstacles obscure portions of your textures to be read, you can change the horizontal offset (%) from the left edge of each texture for its color sampling coordinate to provide a clear path to read the color bars all the way from top to bottom. In the screenshot example above, where the overlay 'MarioKart 64' took up the middle of the screen, a value of 5% or 95% would provide a clear path around the overlay.
After a few seconds of processing the decoded values & TPR are automatically fed into Step 2 of HighResEaser! Simply press RUN, or copy the decoded values for future reference.
If you did click RUN, you would continue just as in legacy HRE, selecting the directory containing the original textures, and watch them load up. Here is the result for the screenshot examples above:
Thanks to [MENTION=6631]microdev[/MENTION] [MENTION=29958]NES_player4LIFE[/MENTION] [MENTION=52820]mode7[/MENTION] [MENTION=58381]Datadayne[/MENTION]
Attachments
-
 1.png26.4 KB · Views: 2,300
 -
 2.png251.6 KB · Views: 2,454
 -
 3.png26.4 KB · Views: 2,005
 -
 4.jpg31 KB · Views: 1,980
 -
 5.png10.8 KB · Views: 1,971
 -
 6.png9.6 KB · Views: 1,973
 -
 7.png11.8 KB · Views: 1,974
 -
 8.png14.3 KB · Views: 2,027
 -
 9.png272.4 KB · Views: 2,061
Last edited:
OP
CCTEX
New member
- Thread Starter
- #2
HighResEaser 1.6 CCTEX MOD
This post is left for documentation of features introduced in v1.6
See first post for most current version and documentation of added features since this release
Download HighResEaser CCTEX MOD 1.6
New features:
-ROBOWRITE function encodes textures to be automatically red by ROBOREAD
-ROBOREAD function decodes/arranges ROBOWRITE textures automatically
Changes:
-
Bugfixes:
-Bugfix from original HRE that prevented loading transparent textures
Watch the ROBOREADER demo from HRE 1.6:
Documentation of features introduced in this version:
Spoiler:
Modification Utility 1: (Listed as 'ROBO-WRITE under the 'font color' drop-down in 'Dialog 1 Load Mark Export...')
NOTE: This must be used prior to ROBO-READ.
Set scaling as desired, ID Position will be ignored. Select your source/save directories as usual. Your textures will be processed with encoded color overlays to be read later by ROBO-READ.

You need to take a screenshot of the encoded textures in use in the emulator, it will look something like this:

Modification Utility 2: (Listed as 'ROBO-READ under the 'ID position' drop-down in 'Dialog 1 Load Mark Export...')
NOTE: After processing your textures with ROBO-WRITE, you need to take a screenshot of the processed background textures while in use in the emulator.
All other parameters are ignored when using ROBO-READ.

You will be asked for the directory containing your screenshot, make sure there are no other files in the directory other than your screenshot.
(Suggests creating New Folder @project64\Screenshot\New Folder)
Once directory is created simply move the Screenshot to the new folder.

You are then prompted for the total amount of textures contained in the background. Be sure to enter this correctly:

Before ROBO-READ processes the screenshot, you have a chance to change the horizontal offset (px) from its default of 1. ROBO-READ processes the screenshot in a straight line vertically from top to bottom. If there is any obstruction (such as a title texture, or other overlay) at the 1px mark, you can enter a horizontal offset value that will provide ROBO-READ a clear path to read the color bars all the way from top to bottom.

After a few seconds of processing the decoded values are automatically fed into Step 2 of HighResEaser!

From here you use the program as you normally would, clicking run, selecting the directory containing the original textures, and you're done. Here is the result for this example for the background textures:

And there you have it. I hope it saves people time. Please note, I did not code input form error handling, so if you enter something goofy into the prompt boxes, you will get a goofy result :happy:
This post is left for documentation of features introduced in v1.6
See first post for most current version and documentation of added features since this release
Download HighResEaser CCTEX MOD 1.6
New features:
-ROBOWRITE function encodes textures to be automatically red by ROBOREAD
-ROBOREAD function decodes/arranges ROBOWRITE textures automatically
Changes:
-
Bugfixes:
-Bugfix from original HRE that prevented loading transparent textures
Watch the ROBOREADER demo from HRE 1.6:
Documentation of features introduced in this version:
Modification Utility 1: (Listed as 'ROBO-WRITE under the 'font color' drop-down in 'Dialog 1 Load Mark Export...')
NOTE: This must be used prior to ROBO-READ.
Set scaling as desired, ID Position will be ignored. Select your source/save directories as usual. Your textures will be processed with encoded color overlays to be read later by ROBO-READ.
You need to take a screenshot of the encoded textures in use in the emulator, it will look something like this:
Modification Utility 2: (Listed as 'ROBO-READ under the 'ID position' drop-down in 'Dialog 1 Load Mark Export...')
NOTE: After processing your textures with ROBO-WRITE, you need to take a screenshot of the processed background textures while in use in the emulator.
All other parameters are ignored when using ROBO-READ.
You will be asked for the directory containing your screenshot, make sure there are no other files in the directory other than your screenshot.
(Suggests creating New Folder @project64\Screenshot\New Folder)
Once directory is created simply move the Screenshot to the new folder.
You are then prompted for the total amount of textures contained in the background. Be sure to enter this correctly:
Before ROBO-READ processes the screenshot, you have a chance to change the horizontal offset (px) from its default of 1. ROBO-READ processes the screenshot in a straight line vertically from top to bottom. If there is any obstruction (such as a title texture, or other overlay) at the 1px mark, you can enter a horizontal offset value that will provide ROBO-READ a clear path to read the color bars all the way from top to bottom.
After a few seconds of processing the decoded values are automatically fed into Step 2 of HighResEaser!
From here you use the program as you normally would, clicking run, selecting the directory containing the original textures, and you're done. Here is the result for this example for the background textures:
And there you have it. I hope it saves people time. Please note, I did not code input form error handling, so if you enter something goofy into the prompt boxes, you will get a goofy result :happy:
Attachments
-
 rw.jpg18.9 KB · Views: 2,015
 -
 rr.jpg19 KB · Views: 1,985
 -
 ssd.jpg31 KB · Views: 2,032
 -
 d1.jpg18.3 KB · Views: 1,959
 -
 d2.jpg21.5 KB · Views: 1,989
 -
 csv.jpg40.4 KB · Views: 2,011
 -
 Title-Composite.png483 KB · Views: 2,017
 -
 Background Capture.png74.1 KB · Views: 1,965
Last edited:
OP
CCTEX
New member
- Thread Starter
- #3
HighResEaser 1.5 CCTEX MOD
This post is left for documentation of features introduced in v1.5
See first post for most current version and documentation of added features since this release
Download HRE CCTEX MOD 1.5
New features:
-HICONTRAST option marks textures with color coded circles, similar to an abacus
-NOBG option fills the textures with white for better legibility of the marks
Changes:
-
Bugfixes:
-
Documentation of features introduced in this version:
Spoiler:
Modification Option 1: (Listed as 'NO BG' under the 'font color' drop-down in 'Dialog 1 Load Mark Export...')
Simply makes the background of the texture white for better legibility of marked textures in the emulator.

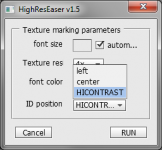
Modification Option 2: (Listed as 'HICONTRAST' under the 'ID position' drop-down in 'Dialog 1 Load Mark Export...')

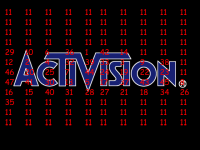
Instead of numbers, colored circles are written to represent numbers, similar to an abacus, shown here:

Un-modded shown here:

As seen in the screenshots, the difference is night and day as far as legibility. In fact, I challenge anyone to read the numbers on the un-modded screenshot, I can't!
The numerical value for the circles are as follows:
Red: 1
Blue: 5
Green: 10
So if a line read GGGBRRR, that would be 38 (3 greens, 1 blue, 3 reds). Take a look at the screenshots if this is confusing. It is very simple when you see it visually.
This post is left for documentation of features introduced in v1.5
See first post for most current version and documentation of added features since this release
Download HRE CCTEX MOD 1.5
New features:
-HICONTRAST option marks textures with color coded circles, similar to an abacus
-NOBG option fills the textures with white for better legibility of the marks
Changes:
-
Bugfixes:
-
Documentation of features introduced in this version:
Modification Option 1: (Listed as 'NO BG' under the 'font color' drop-down in 'Dialog 1 Load Mark Export...')
Simply makes the background of the texture white for better legibility of marked textures in the emulator.
Modification Option 2: (Listed as 'HICONTRAST' under the 'ID position' drop-down in 'Dialog 1 Load Mark Export...')
Instead of numbers, colored circles are written to represent numbers, similar to an abacus, shown here:
Un-modded shown here:
As seen in the screenshots, the difference is night and day as far as legibility. In fact, I challenge anyone to read the numbers on the un-modded screenshot, I can't!
The numerical value for the circles are as follows:
Red: 1
Blue: 5
Green: 10
So if a line read GGGBRRR, that would be 38 (3 greens, 1 blue, 3 reds). Take a look at the screenshots if this is confusing. It is very simple when you see it visually.
Attachments
-
 dropdown menu.jpg40.1 KB · Views: 367
 -
 Highreseaser1.5 NO BG.png13.4 KB · Views: 1,914
 -
 Highreseaser1.5 HICONTRAST.png13 KB · Views: 1,929
 -
 with mod.png159.9 KB · Views: 1,951
 -
 without mod.png587.3 KB · Views: 1,854
Last edited:
This removes any human error, that is super cool.
You never cease to amaze!
@CCTEX
Couldn't you have greater color range if you programmed a color sequence? You can go from 32 bit to 128 bit by having the script write and read color patterns instead of solid rows.
I'm not sure, but I don't think they exceed 10 or 14, 24 should be more then enough.
As far as the amount of textures per background; I don't think that they exceed 120.
OP
CCTEX
New member
- Thread Starter
- #6
@CCTEX
Couldn't you have greater color range if you programmed a color sequence? You can go from 32 bit to 128 bit by having the script write and read color patterns instead of solid rows.
As far as the amount of textures per background; I don't think that they exceed 120.
I absolutely could do that. Right now, i just took the path of least resistance and used the existing variables that count the amount of 1s, 5s and 10s for the abacus, divide each corresponding RGB channel into sections corresponding to the maximum amount any of those variables could have (for example, 1s never exceed 4 so R is divided into 5 sections to represent 0-4), then assign a color value dead center of one of those sections that the script can later read from the screenshot you provide with a tolerance for the color being slightly off. I noticed PJ64 distorts color channels slightly so ranges were necessary. Definitely not the most logical way to do it, but it required the least amount of re-coding. If the amount of textures doesnt exceed 120, then i guess it doesnt matter anyway! Best part is, it takes under 3 seconds to process.
It might be useful to include an x axis offset option for when the script processes the color samples. Right now it statically samples 1,y all the way down. It may be useful if user could provide x in case there is an obstructing texture covering part of the background in the screenshot, you could have x correspond more towards the center or right side of the screen, depending on where the obstructing textures are located.
There must be a mathematical solution to separate alike colors from ever being next to each other within the same texture.
Shading colors are more likely to be misread I would think. A sequence of hard colors such as Red Yellow Blue Green would be safer.
I'm not sure what the code would be or how to find it.
As far as "obstructing textures" I have posted about this a few posts up. Not sure if it helps.
Shading colors are more likely to be misread I would think. A sequence of hard colors such as Red Yellow Blue Green would be safer.
I'm not sure what the code would be or how to find it.
As far as "obstructing textures" I have posted about this a few posts up. Not sure if it helps.
OP
CCTEX
New member
- Thread Starter
- #8
Considering i dont need to support more than 120 textures, theres no need to change anything as the existing code already handles the pj64 color degradation flawlessly. I just added the option for the user to choose the x coordinate for the sampling line. I put it in so users dont have to necessarily make transparent title/overlay textures to get a perfect, unobstructed screenshot, they can just leave them as is and tell the program where they want the sampling line to be, avoiding the obstructions.
Its actually ready to release, but I'm trying to see if theres a way to take that automated number/comma list and feed it directly into step 2 of his script, making it as seamless as possible, no having to restart the script, and no copying or pasting... Would be cool!
Its actually ready to release, but I'm trying to see if theres a way to take that automated number/comma list and feed it directly into step 2 of his script, making it as seamless as possible, no having to restart the script, and no copying or pasting... Would be cool!
Sounds great, I was having a hard time trying to figure out how you would code RGB. 120 should be just right and if not this is still a huge improvement that can be refined.
One step processing would be even better.")
One step processing would be even better.
999 textures! This has me wondering if, with some tweaking; sprite mapping could become possible. It would require video capturing of game play and output to a 3d interactive spirit sheet. (Model of slices) (GIF).
OP
CCTEX
New member
- Thread Starter
- #12
1.6 Bugfix Update:
1. Found & fixed a bug of mine in the ROBOWRITE function when transparency is present in title textures, affecting the width of the encoded color overlays.
2. Found & fixed a similar bug of Microdev's present in his function for loading/arranging marked textures, which caused title textures with transparency to be cutoff.
The download link for version 1.6 has also been replaced in the master post to reflect these changes.
Attachments
1.6 Bugfix Update:
1. Found & fixed a bug of mine in the ROBOWRITE function when transparency is present in title textures, affecting the width of the encoded color overlays.
2. Found & fixed a similar bug of Microdev's present in his function for loading/arranging marked textures, which caused title textures with transparency to be cutoff.
The download link for version 1.6 has also been replaced in the master post to reflect these changes.
That's right! I had forgotten that HRE shrinks the image to only use the visible texture thus causing a read error.
Thanks for the fix!
[MENTION=112808]CCTEX[/MENTION] I have yielded my first post in this thread to you, thus granting you a third top post to add attachments.
Please keep attachments with in the top posts for the sake of organization. This way information is not buried deep in the thread.
Great to finally see someone giving some love to this tool. Especially this bug is something I wanted to fix for a ages but never did...2. Found & fixed a similar bug of Microdev's present in his function for loading/arranging marked textures, which caused title textures with transparency to be cutoff.
However I was under the impression that this is a bug with the photoshop scripting engine. Thus I wanted to fix it by setting an intransparent dot to the upper left and lower right corner and replacing it with the right pixel after the tile has been placed. But as you mentioned it seems to be a bug in the script. Just out of curiosity - could you please show me what you fixed?
I have not objections at all to whatever is done with this tool as long as the license is respected (GPL v2)
OP
CCTEX
New member
- Thread Starter
- #15
Great to finally see someone giving some love to this tool. Especially this bug is something I wanted to fix for a ages but never did...
However I was under the impression that this is a bug with the photoshop scripting engine. Thus I wanted to fix it by setting an intransparent dot to the upper left and lower right corner and replacing it with the right pixel after the tile has been placed. But as you mentioned it seems to be a bug in the script. Just out of curiosity - could you please show me what you fixed?
I have not objections at all to whatever is done with this tool as long as the license is respected (GPL v2)
Hey microdev!
I only changed one variable in one line of your code for the fix:
Code:
			//CCBUGFIX
			newDoc.resizeCanvas((rowCount*texture.width),(Math.ceil(displayOrder.length/rowCount))*tileHeight)
			//newDoc.resizeCanvas((rowCount*tileWidth),(Math.ceil(displayOrder.length/rowCount))*tileHeight)
			//CCBUGFIX
I made a similar "mistake" in one of my add-ons, that's why I noticed it. It's really not an issue with the scripting engine, it's how photoshop behaves when in normal use as well.
For example:
You have a transparent document 400x400 px with a 10x10 px solid red square dead center, you select all, copy, new document, and when that new document dialog appears, the suggested size will be 10x10 not 400x400, because empty space isn't copied to clipboard.
Cheers, glad you approve
OP
CCTEX
New member
- Thread Starter
- #16
That's right! I had forgotten that HRE shrinks the image to only use the visible texture thus causing a read error.
Thanks for the fix!
[MENTION=112808]CCTEX[/MENTION] I have yielded my first post in this thread to you, thus granting you a third top post to add attachments.
Please keep attachments with in the top posts for the sake of organization. This way information is not buried deep in the thread.
Will do, I wasn't able to re-add the attachment to the second post last night for some reason, that's why it was in the post above. Speaking to organization, is there any way to swap the order of post 1 and 2? Seems like it would make more sense.
I'll see what I can do.
As it turns out there is a 10 attachment limit per post.
As it turns out there is a 10 attachment limit per post.
OP
CCTEX
New member
- Thread Starter
- #18
[MENTION=6631]microdev[/MENTION] (or anyone else who cares to weigh in!), are you aware of any cases where there is more than 1 texture per row in a background or title? [MENTION=29958]NES_player4LIFE[/MENTION] and I are not, but if you have an example, can you tell me which game so I can test? I need to further modify the original code to fix distortion with loading textures with transparency, AND, (I forgot before) do the same thing for your exporting function of the high res slices. Thanks!
Space Invaders
@CCTEX. Yes there in fact screens that contain a range of textures. An example would be Space Invaders.
These textures are offset by 76 pixels in the center. The area in question belongs to the left hand most side of the screen and are displaced to the center column.
EDIT PSD added
@CCTEX. Yes there in fact screens that contain a range of textures. An example would be Space Invaders.
These textures are offset by 76 pixels in the center. The area in question belongs to the left hand most side of the screen and are displaced to the center column.
EDIT PSD added
Attachments
Last edited:
OP
CCTEX
New member
- Thread Starter
- #20
Ok, currently, ROBO READ does not support multiple textures per row, shall I add support then? If so, could you possibly post the invaders textures you're talking about so I can test the new code?
FYI, I've now completely fixed the bug from original HRE in a somewhat unorthodox way.
Update: [MENTION=29958]NES_player4LIFE[/MENTION] whoops, didn't see your attachment
FYI, I've now completely fixed the bug from original HRE in a somewhat unorthodox way.
Update: [MENTION=29958]NES_player4LIFE[/MENTION] whoops, didn't see your attachment
Last edited: